
Friday, November 24, 2017
Tuesday, October 31, 2017
How to Clean Desktop and Laptop Keyboard
Computer users such as students working in their school assignments and projects, employees in their workstations, or freelancers creating blogs. Without the keyboard, we cannot do the task efficiently.
Obviously, it is an output part of the computer may it be wired or wireless.
We use a computer for typing our necessary work without noticing the dust around, the food and drinks we are consuming on hand with the computer. Drinks like cola, soda, water, juice spilled, even fall out hairs directly to the keyboard. Then suddenly when we take heed of those keys we will observe the dust, crackers, dirt crumbs, and grease, sticky things inside and covering the keys as we examined it really closely. Mix dirt from different things and food all in a keyboard. Wow!
Well what important is, It is not too late to realize that our keyboard is full of bacteria that could transfer to our fingers or hands and who knows what we can get from the germs like diseases or allergies. It is inevitable not to get such germs on the keyboard because of extensive use. Possible causes of dirt or tiny things besides the keys during keystrokes are letters or keys not functioning most especially the commonly used letters like keys (BACKSPACE, Letter "e" and SPACE) according to Business Insider.
Well what important is, It is not too late to realize that our keyboard is full of bacteria that could transfer to our fingers or hands and who knows what we can get from the germs like diseases or allergies. It is inevitable not to get such germs on the keyboard because of extensive use. Possible causes of dirt or tiny things besides the keys during keystrokes are letters or keys not functioning most especially the commonly used letters like keys (BACKSPACE, Letter "e" and SPACE) according to Business Insider.
I experienced it before myself cleaning the whole keyboard keys was so effective for me. So when you experienced the same, don’t worry because with enough patience and determination to clean your keyboard, you can do it and germs stuck with it will be fully eliminated.
The thought that counts could be cleaning it with the following directions.
Before you start, you need to make sure that no current is flowing in your computer. To be sure, shut your computer down.
Plug in our out the keyboard. (If you are using the wired one) in to the system, plug it out to make sure no current shock is flowing (at least it’s up to you). If you are using the wireless keyboard, you may only shut down your system.
Cleaning Desktop keyboard (without taking off the keys)
For normal dirt in your desktop keyboard, You may choose to clean those without taking off the keys. You can do this by first preparing some cotton buds, at this time a cotton bud is your buddy in cleaning your keyboard.
Dip it with isopropyl alcohol, some 70% alcohol is recommendable. Just a gentle cleansing agent to prevent the fading of the letters in the keys. After dipping, Scrub it now with the keys directly to the dirt and the surface that needs to be cleaned such on the sides, face, top, and bottom.
You may also use a lint-free cloth or if you don’t have it, the alternative could be the unused lens cloth. If not available, just use a silky and soft tiny cloth that can suit the sides of the keys to be able to clean them.
For the laptop keyboard: The mentioned direction is also applicable.
Some may use a small toothbrush (You may use an old brush but make sure it is clean and the bristles are capable of taking out the dirt’s of the keys) I’ll be making a video tutorial for laptop keyboard soon.
Dub and brush it gently towards the keys and make sure that the cleansing agent can be (gentle alcohol, gentle dishwashing liquid, fabric conditioner) you are using is not spilling under or inside the keys because if you are not careful, the keys may not function once you turn on again the computer suddenly because inside the keys are wet and it may affect the system.
The technique here is you can first dub the brush into your chosen cleansing agent. Make sure it is not overly wet by dubbing it again in a cloth or tissue that can sip the excess water before brushing. Then brush it into every side of the keys. The recommended position of brushing is upward so that you can easily swipe to caught the specks of dirt easily.
(Note: Do not remove the keys on the laptop keyboard to avoid damage. Only in desktop mostly the keys are removable.)
Cleaning Desktop keyboard taking off the keys
I have experienced to have a very dusty keyboard and I was shocked to see what is inside after removing the keys from it.
This is the back of the keys while still in store in the half of the board. I unscrewed the screws first before opening to be able to remove the keys.
 |
| Image shows 'the back or the half part of the keyboard' |
Typically hairs, dust, dirt, small bits of crackers, are those things I saw on the inner surface of the keyboard. See below image.
 |
| Keyboard trench and removed keys |
Most of the desktop keyboard keys can be removed by using a safe tool such as a screwdriver or any turn screw or any bread knife. It is very simple to remove but you need an extra effort as you are not pulling out one key but many keys usually around 70 keys.
I suggest also that while you remove the keys out the board, put them into the right place while away or take a picture of the keys to knowing their original position. Prepare a keyboard map. See below image positioning the keys in their right place while away.
 |
| Before: I have a very dirty keyboard |
1. The first step is to place your chosen tool in the corner of the key and then lift, move it up to remove the keys. Some desktop keyboard is made as irremovable so you shall observe the areas of your computer if it is removable or not. To be sure, you can search the model of your computer and look if it is removable or better yet contact the manufacturer to prevent your keyboard being damaged. You can also try to shake gently the keyboard to put out the dirt and dust easily.
2. If the keys are already removed and everything is ready to be cleaned, wash to clean each key using the chosen cleansing agent (could be alcohol, liquid soap mix with water, and etc.) In my keyboard case, I used alcohol with the small amount of water.
3. Clean the “Keyboard” or the storage displayed of the keys. “the board or the trench”. Dip a cloth or can use small/disposable towel into the chosen cleansing agent and wipe the keyboard surface. But warning on this, you have to be careful on cleaning the trench as sometimes there is appeared keyboard electric lines(see below image) that can be damaged once it becomes wet and directly used with electricity.
 |
| Image shows what is behind the soft circle storage of keys |
If some part of it accidentally poured or spilled by the small amount of water, you have to make sure the keyboard trench is dried off before using. To do this, you may also use a soft vacuum or compressed air. The image below is a cleaned keyboard trench.
 |
| After Cleaning: My sanitized keyboard |
Before I input the keys back again into the keyboard trench, I tried to position different letters formed a word “ I love you” for my readers. On the other hand, wrong positioned of the returned keys may affect the corresponding letter keys. So the keyboard map or It is essential to prepare a guide like what I did which I re-positioned them while out on the keyboard trench.

 |
| Image shown is when I was happy to accomplished cleaning my keyboard |
4. When the keys are now dry, cleaned and ready to be used again, return the keys to the board and put them back into their right place. To feel the accomplishment wipe the cloth into the surface on the returned keys. If the keyboard is wired then plug in it to the system again.
Now your keyboard is ready to be hit again for using with a lesson learned. At least don’t bring your snack always at hand while typing. You may also test the key function and Turn on the computer.
Welcome back clean and restored keyboard!
Welcome back clean and restored keyboard!
 |
| Rebuild keyboard now ready to use :) |
Disclaimer: I'm not really an expert, this is only base on my experience and resulted in effective and successful. So, clean your keyboard carefully at your own risk.
Share your comments below. To follow Madspad., you may visit the contact page or Kindly check the 'Stay Connected' section on the right pane :)
Monday, October 30, 2017
Short but Fun Call Center Training Experience
Call center class and training is truly not an easy job. Not easy in a sense that some call center representative handles calls and encountered many conflicts through which is part of every job or irate customers that is inevitable.
Some they may call it a stressful job if you cannot really handle the calls along with the customers. When you can put your heart in a job like this, can do the job great and you have a passion for the job while you have fun with it, you can stay longer in the job.
Main reason why I applied in a BPO Company in a Call center job, is because of three truthful reasons: My first I.T job did not push thru (story is available below this paragraph), I want to have a work before Christmas and the good reason is I want to challenge myself if I can do the job. There is no real wrong in trying, right? I was also curious to know if I can handle calls along with giving of service through my communication skills.
Before I applied in a customer service.position, I became frustrated with my previous application to high paying I.T company that did not push through for the reason that is too far away from my house. Unfortunately, during those times I was not able to live on my own or rent on a dorm near the area I was supposed to work. I did not expect that I was going to be assigned in that branch so i refused to continue my contract and happily they did understand. So that was the third strange reason.
The most thing that helped me pursue my call center application is my determination towards enhancing my 'communication skills'. This call center experience is my first job that I have accepted but not the first job I applied.
You can read about how I handled the job application process in a Call Center together with ‘Call center related interview questions with Good Answers’ also available.
So being in a Call Center field was definitely my choice and I did not regret it.
We handled a very big private company's account. This first-ever experience was where I learned to use lots of call in mobile phones as sample training such as conference call. A conference call is a kind of mobile call which is made for talking to involve people at the same time using your phone so everyone involved can either speak or listen only to the voice call or can be both. I've also learned Call Forwarding, Sup Call which means Supervisor Call transfer if the customer requested to talk about the problem and most important is how to build rapport with the customers. Imperishable is the learning about our own client's mission and vision statements, likewise their Core Values.
The most fun and memorable experience I had during my stay is the free lunch every day. Practically, we can save more money instead of buying meals during lunch so it was fun for me, I was so grateful. Conversation skills and team playing enhancement via providing games like "I want to be a ‘tutubi(grasshopper)’’, ‘hephep hooray’ (game first learned in Wowowee show), tongue twisters game. Those games unleashed my childlike side and made everyone fun and excited to work more!
Entirely, the experience of training was great and I have learned a lot from my Project Managers, Team Leads, Assistant Leaders and other Members and met a lot of different kinds of people in the industry. First days of training, I was like really shy, silent, killjoy, boring surrounding with strangers but with the help of lessons on enhancing communication skills and training regarding building relationships with people particularly of course with customers. I was transformed and changed in a good way and felt that my communication skills became enhanced that every day with my colleagues, we are not competing but we built a friendship. We built a happy relationship.
I was determined to pass every exam we had until it ended when I found a more suitable job for me. I had to say "See you again" yet "No "Goodbyes". :) My Call Center experience is indeed unforgettable.
I've been with a Call center account management training for only a few months. Yet still recommend aspiring applicants grab opportunities you may get most especially if with wonderful perks, shall mention not to regret in the end. But instead, be thankful for all the learnings and eureka's. Never afraid try other things that may challenge you, be fearless and spontaneous sometimes.
On the video below, I want to share the interview questions and my answers that I uttered during the whole interview. The type of questions I had was the common things like ‘tell me about yourself’, “where do you see yourself after 5-8 years?” Please see below video:
These common interview questions along with the possible answers are not mine being induced but are only a guide on what to answer on call center interview.
Still, natural or the original answers essentially being yourself are one of the things worth to practice on a stipulated time before your interview day.
Good luck and hope you pass to get the job offer. My natural answers during interview helped me a lot to be who I am today. My communication skills improved unlike as a fresh graduate before I did not know how to be vocal and communicate with other people. So I hope my tips would be helpful to the job applicants who are reading this post for Call Center jobs, or any call center position may it be technical sales, or quality assurance.
I also have helpful videos that focus on 'Sales Interview Questions with Good answers that is usually for a job target positions like inbound customer call center agent, sales representative and many more sales call center related jobs for freshers or experienced applicants. You can watch it here or click the hyperlinked name.
For Call Center interview questions and answer for experienced candidates, You may watch here.(This contains common questions with good answers suitable for experienced applicants)
Saturday, October 14, 2017
How to set Google Plus profile picture to private? (2014)
Most of us care for our pictures to be organized or properly arranged in our Google Plus Account especially people who are Google active user. But did you know that you can organize your photos on your Google Plus Account? The answer is YES!
If you want more privacy, Do you want to set your Google Plus public pictures in 'private' only? Now if your answer is a NO NO, I will tell you how I made my Public Photo to private. Thinking maybe our photo privacy changes depends on us like on Facebook, I tried observing my unnecessary photos that still stock my Photos, saved, including images I used on my blogs.
These photos are all public big time and with that, blog photos should normally be public, Furthermore, If you make it Private, when others view your blog, images you made private will not appear. So never try making your photos associated with your Blog private. When you check your public profile photo, it is public, right? Even my current profile picture right now is public at first, but now it's private! Take a look at mine here. Now it's private, if you have Albums that is not connected to your blog, you can also make it private.
To make it more understandable. I included images which tell you the step by step on how to make your profile photo to private.
1st, Click the Photos on Your Google Plus Profile.

2nd, Click More to View All "Albums"

3rd, Choose your Profile Photo album and Open it

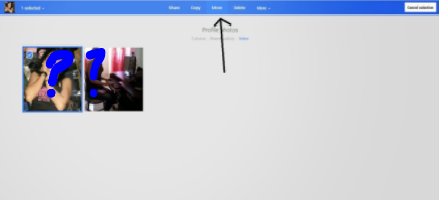
4th, Select the picture that you want to be unviewable and then click 'Move'
5th, Make a new folder(as cited in my example I made an album entitled it "private pics" ) then choose Move.

6th, Now you see that your profile pics are now private, not shared and unviewable.

Try it out by viewing your profile as public, Click your own profile photo. Now, you'll see nothing but a dark rectangle. :)
Note: Never make your photo albums that connected to your blog, private; because if others see your blog, the pictures in your blog will also be unviewable. You can also do that in your Cover Photo or any of your other albums.
Cool when you watch the video below then Subscribe! Thank you :)
How to set Google Profile Privacy Settings? Updated for 2017
I made a post before about setting Google Profile picture from the public to private that I previously discussed from my tech blog before around the year 2014. This post is specially made to protect your privacy settings more for the active users of Google.
This video was made last 2014
Now, I'm making the post again for this year (2017) to share my thoughts regarding profile picture on Google Plus as I was also checked my images that used in my blog privacy settings whether it's public or private.
I have tested it using another account and viewed my profile that is also associated with this blog. To my surprise, some of my photos used in blog still appeared and my profile picture is automatically on public and was easily seen on my google plus profile so I went back to my account, checked my settings and learned that you cannot change it's privacy settings the same way before but You can have a privacy checkup for your account and that is really good to know.

Image when I checked my profile using other accounts

This is the image appeared when I clicked About

I scrolled down the About navigation page and saw my public photos
Once I navigate through the check-up, I was able to customize or choose to make my images turned to private. Able to limit the information that was shared with others before.

I went back to my account, checked it and saw the word "Privacy Checkup So I tried it and it works effectively helped to secure my privacy settings more.

When I'm done changing my settings including Youtube videos, posts, and settings. I went back using other account and Now my images cannot be easily seen.
You can still manage your privacy settings through Privacy Checkup. There, you can easily organize and manage your account including your YouTube and Google plus account privacy settings for your own preferences. WOW! Right? Salute to Google Developers for this complete customizing for its users.
Subscribe to:
Posts (Atom)
More Readings


LOVE IS..
